Reflections – Arthur Difford

Week 1


Week 2

In week 2, we went through the types of photojournalism in class. These were illustrative photography, which includes collages, multimedia, studio and portraiture images. Reportage photography includes images of war, politics and news. Documentary photography includes social, industrial, and street/candid images.

The task for the lecture was to initially research the history of my desired genre. I found the earliest example of sports photography, which was an image of tennis player Mr Laing, taken all the way back in 1843.

Next, I needed to identify a specific sports photographer, leading me to the work of Neil Leifer, who took an iconic photograph of Muhammad Ali knocking out Cleveland Williams.

I then collated three unique images, one from Leifer, another from AFP, and finally from Chris Szagola. All of the photographs that I selected are incredible snapshots taken in less than a millisecond. This made my hyperaware of the fact that often the best sporting images are taken in exactly the right spot, at the right time, with optimal lighting.

I found this task interesting as it made me further understand the history of sports photography. The power of sporting images has existed for almost 200 years, with some of the worlds most famous photographs existing in the world of sport. The task helped me recognise the importance of preparation whilst also being ready to capture things on the fly, and developing those skills is something that can only be improved with time spent behind the lens.


Week 3

The week three task was to select three images. The first needed to be an image used in the news that had been set up or constructed. I selected an image of two Ukrainian men stood in front of rubble and broken vehicles in the war torn city of Kryvyi Rih. This image was clearly set up as the two men were posing, looking at the lense, in a specific position.

The second task was to find a news photograph that had been taken from a point of view that affects the story. I selected the iconic image of Lee Harvey Oswald’s assassination, with the front on shot witnessing Jack Ruby point his revolver towards Oswald’s chest, shock on the faces all around. That image would not tell the same story if the photograph was taken behind Oswald.

The final task was to identify a photograph whose meaning is disputed. I selected the influential image of Colin Kaepernick taking the knee during the American national anthem. The action of taking the knee signified Kaepernick’s desire to draw attention to the ongoing civil rights movement. However, right wing media picked up the image and told the story that Kaepernick’s actions were a direct insult towards the United States of America. This could not have been further from the truth, but many in the USA still believe that Kaepernick’s actions were out of order.

I found these tasks interesting as it helped me understand how the perspective of an image can be changed both internally and externally. Images can be set-up and manufactured to create an exact representation of what was desired. Images can be viewed alternatively depending on what angle the photograph was taken from, with the distance, light and ‘busyness’ all having an impact on what an image can show. Also, images can be framed to hold a different meaning, changing the way that people depict the photo and what it stands for.


Week 4


Week 5

The week 5 task was about Shutter Speed and ISO. The first part of the workshop was about understanding ISO, how it works, and how the differences in ISO can change an image. This meant studying certain images and figuring out what steps had been taken in order to create the final image.

The task was to them put what I had learnt to use. This was taking many images, some with a slow shutter speed, and some with a fast shutter speed. Taking photographs in different places that had differing levels of light made me realise how that can effect both slow and fast shutter speed images.

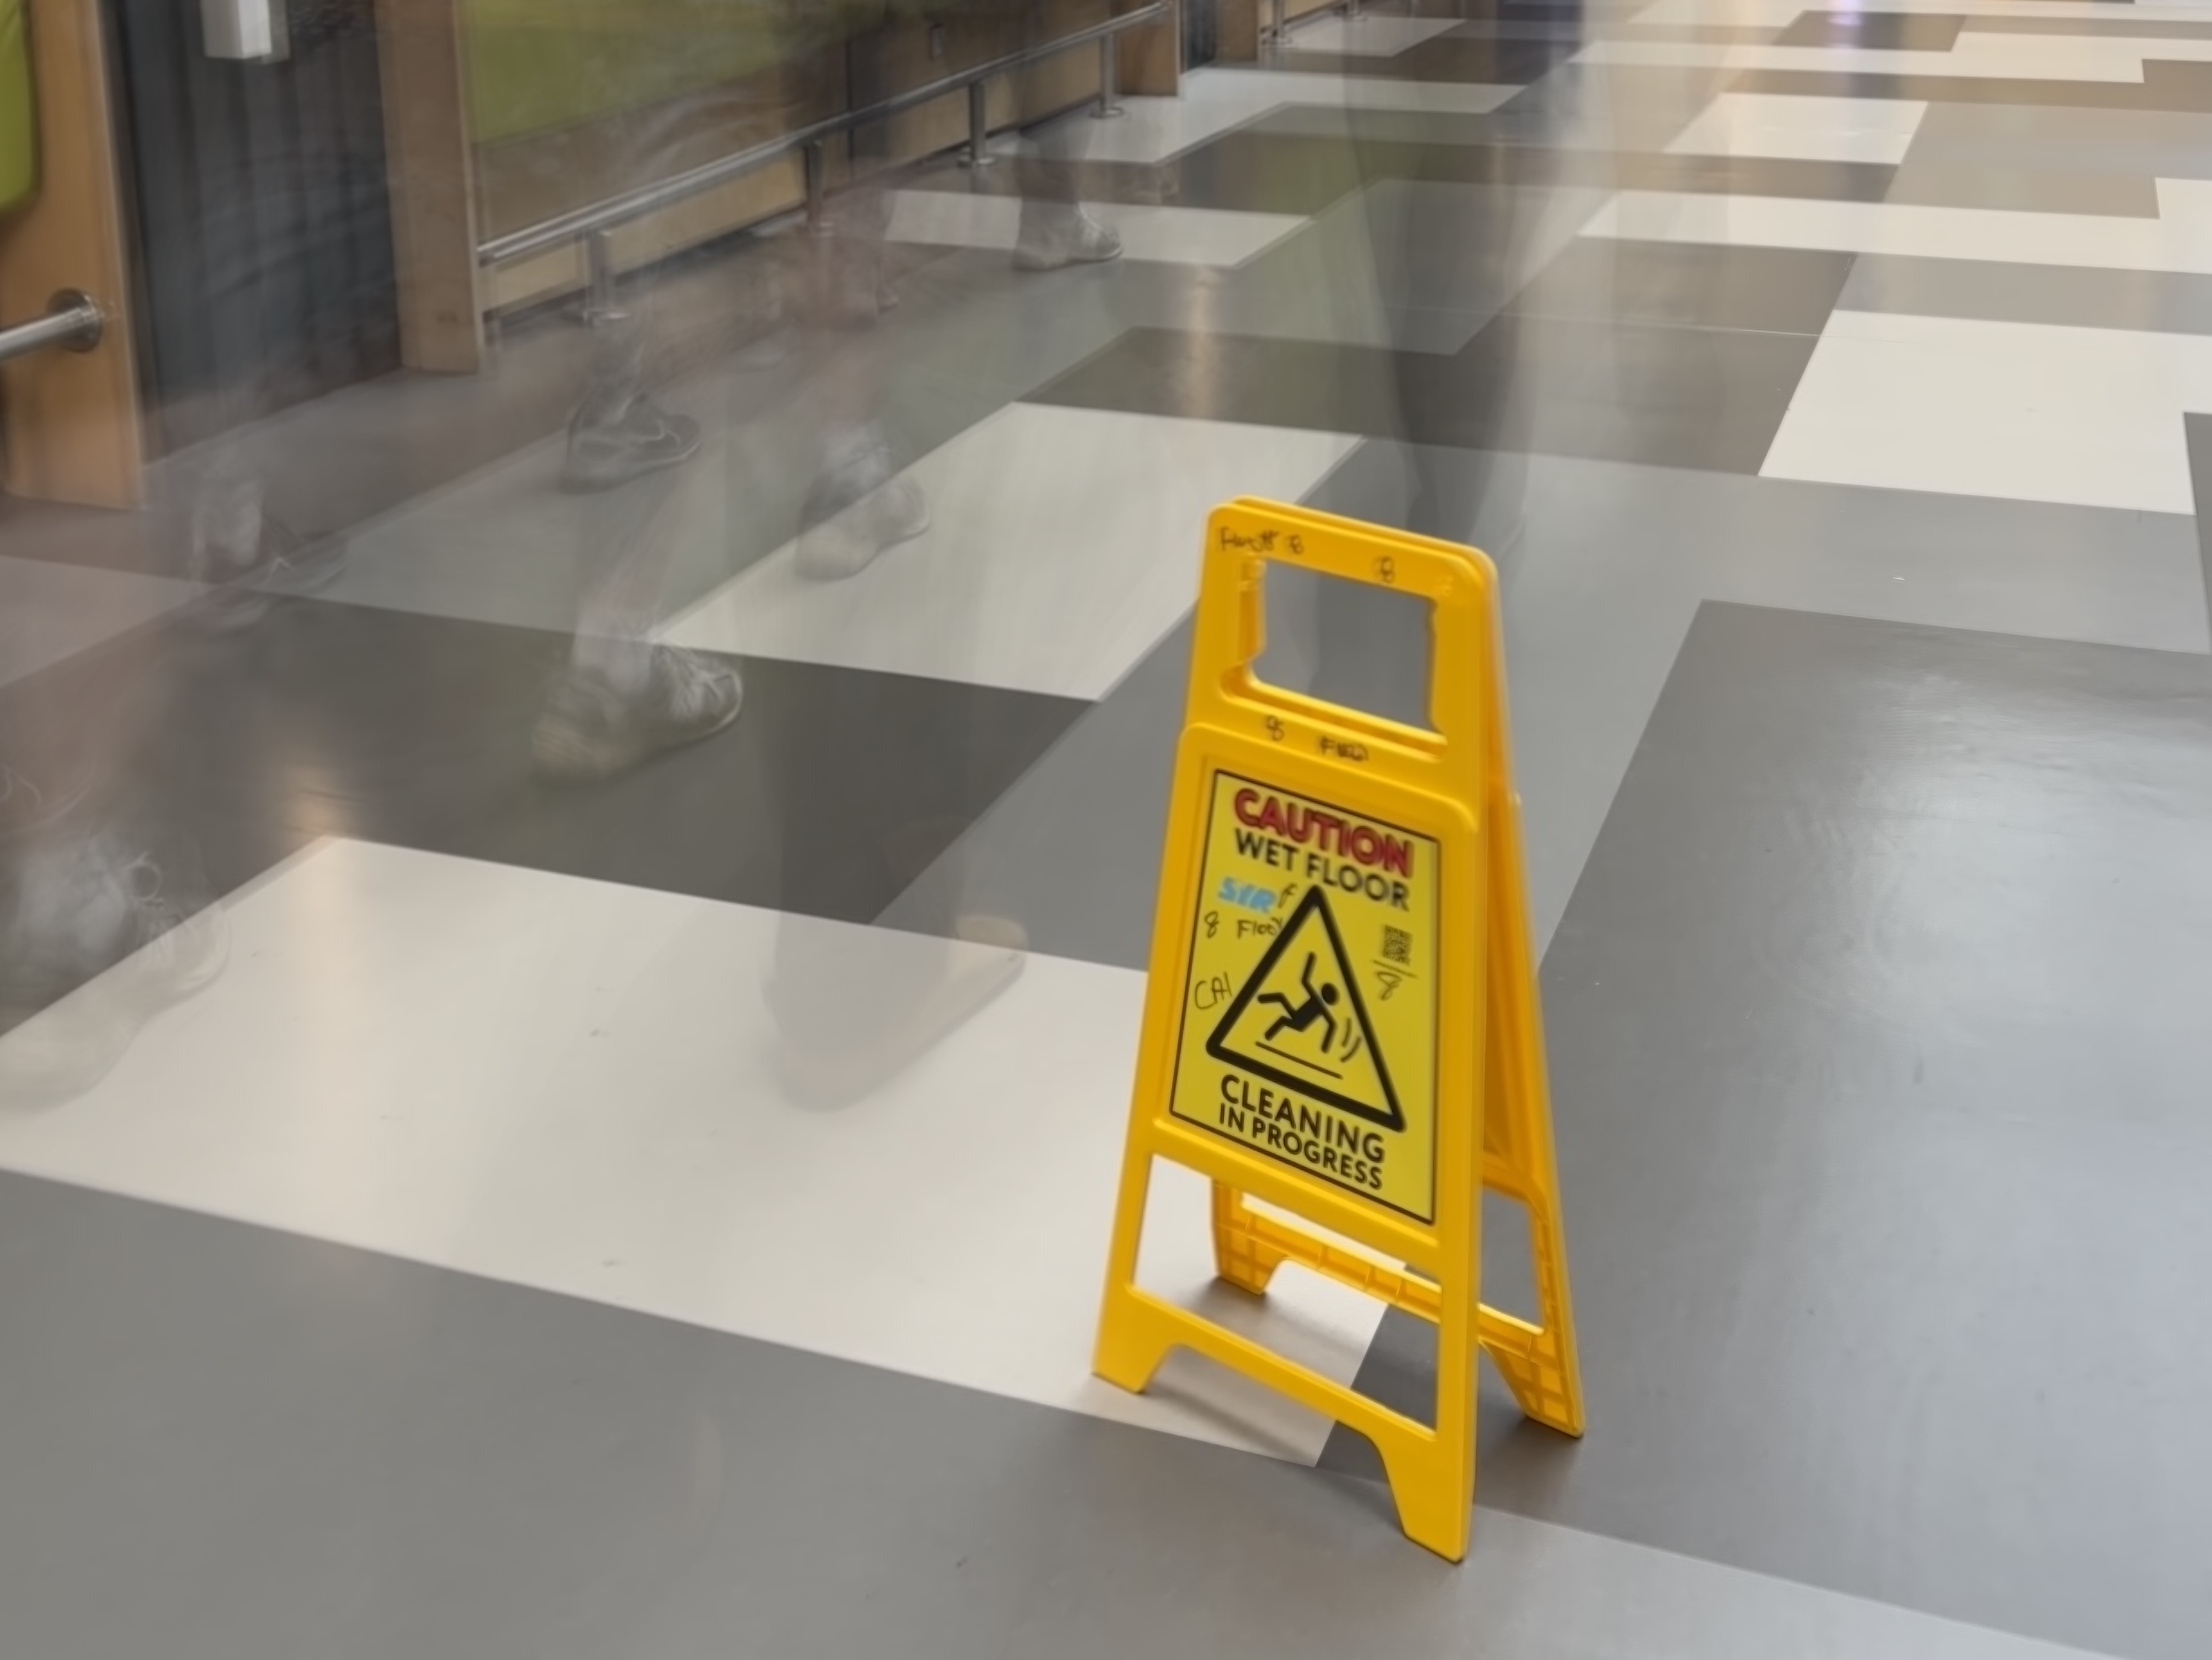
I felt as thought the slow shutter speed image that I took was good as it mixed elements of having a completely stationary caution sign on the floor, with visible movement of people walking in the background. The overall balance of the image is nice to look at and I am happy with the final product.

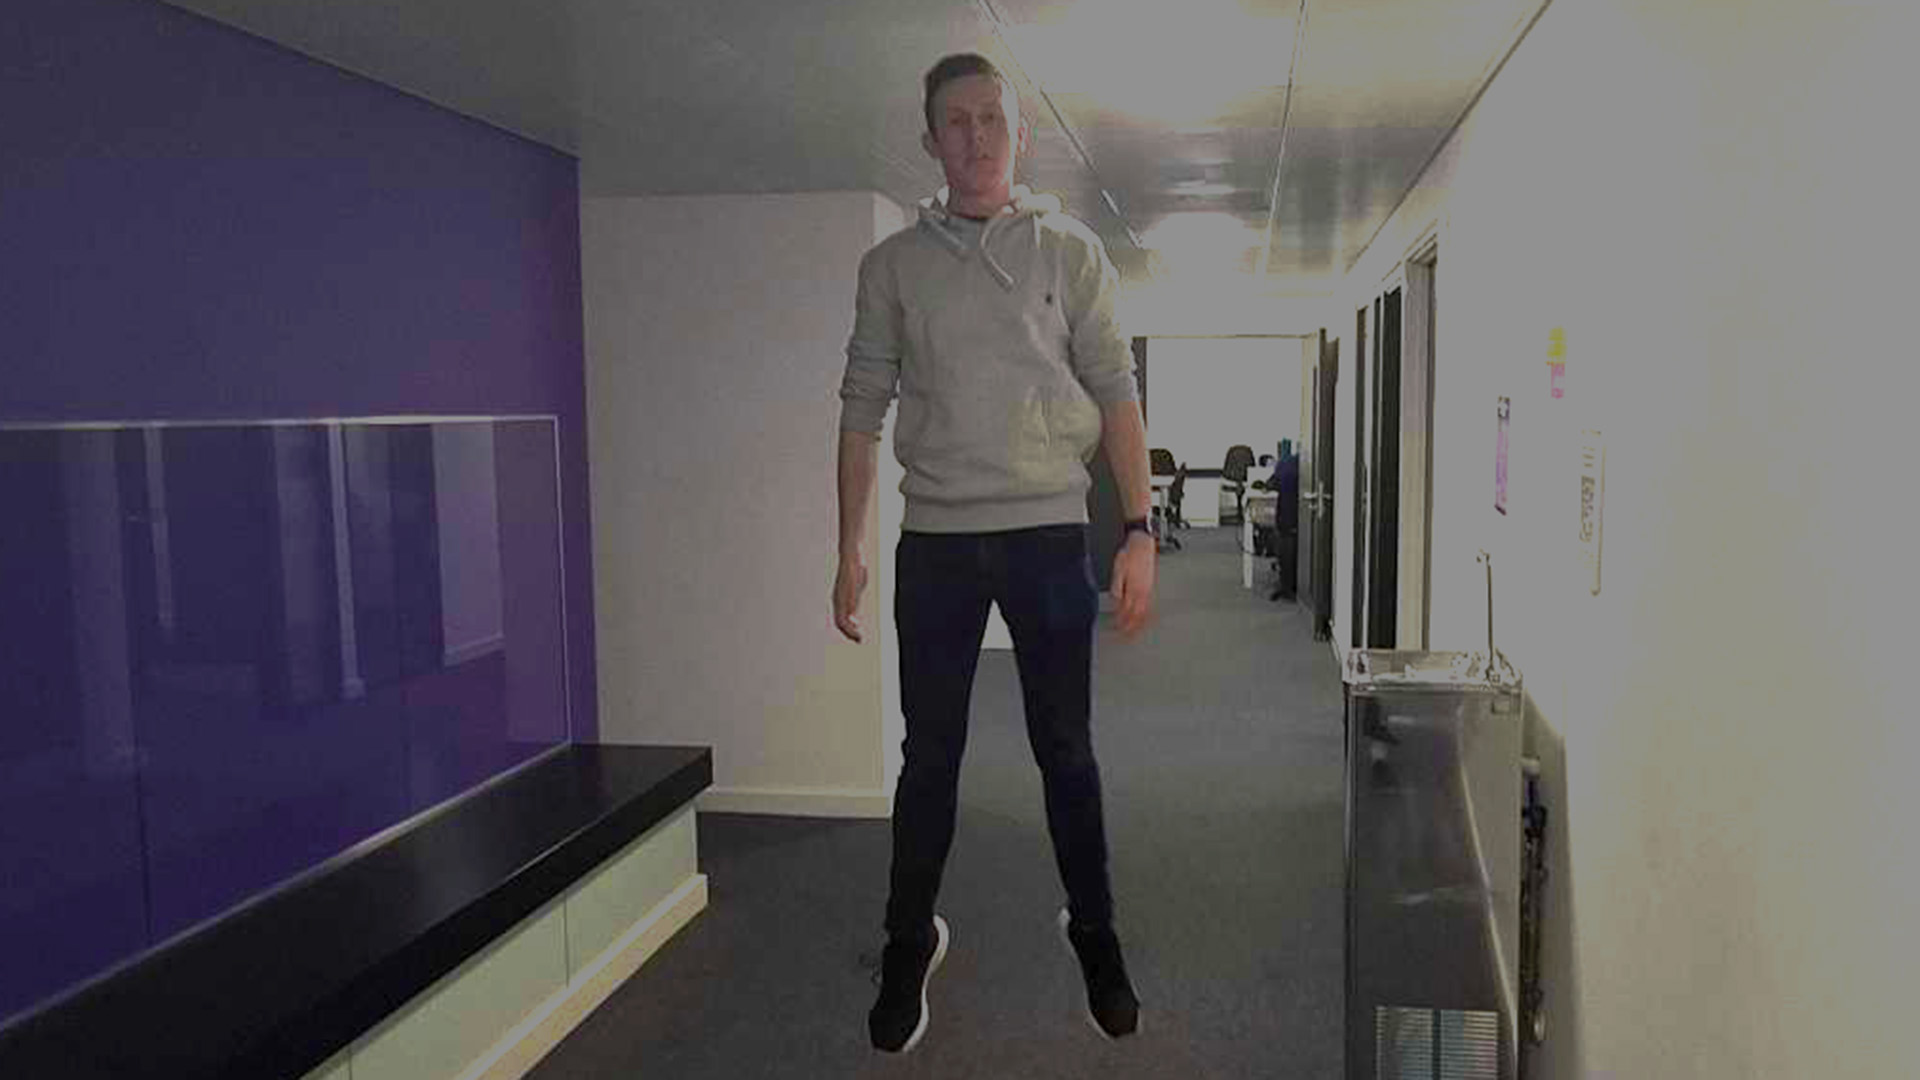
The fast shutter speed image that I took was a perfect example of how an image can capture a snapshot of a minimal moment in time. I took a photo of Leo seemingly levitating in the air, with no blur effecting the image. I was happy with the crisp detail that was captured in the image.


Week 6

The week 6 task was all about getting to grips with colour and image correction, and how to manipulate images within Adobe Photoshop. The ability to change and develop images in post-production unlocks how an image can be perceived.

Getting to grips with all the capabilities that Photoshop provides is an extensive task, but incredibly useful. Cropping, adjusting hue and saturation, and changing the brightness can revolutionise an image. Marginal colour change can elevate certain elements of an image, dulling certain colours, whilst making others pop.

I attempted to alter an image that I had taken that uses elements of depth of field. The photo is through a goal net, capturing two players in focus. I wanted to make the white lines of the net even quieter, drawing more attention to the intended subjects of the image.

The final product was okay, I did what I intended to do, creating the changes desired. It wasn’t bad for a first attempt but I know that I want to improve my skills with practice. I used curves to micro-manipulate the image in certain places, which was something I was previously unaware was possible. This task is one that I will continue to revisit in the attempt of developing my awareness of colour and image correction.


Week 7

The task done in this workshop opened my eyes to editing photographs in a manner I had never seen before. The Perspective Crop Tool gives the user the ability to completely change the perspective and aligning of an image. The power that this tool provides is incredibly effective, and it was a lot simpler to execute than I was expecting.

The first task was to crop a portrait image into a landscape image with the correct ratios. I have a few portrait images of players from my work covering Huddersfield Town Women, so this was a straightforward process, but I wanted to ensure that the balance of the image remained even and sharp. I feel as though I can do this very easily.

The second part of the task was using the perspective tool and again, in practice it was incredibly simple to use. This feels as though it is a tool that will get regular use in my work moving forward.

The final part of the workshop was a cleaning up task, going through my work in this module and making sure that everything is to the highest level. This included alt. text, captions and ensuring that multimedia elements correctly fit the piece of work. This is something I am used to going back and doing when I am creating my own work that is published online.


Week 8

For my photojournalism project I am planning on using images that I have taken across the season at Huddersfield Town Women. I would like to display the expressions and focus on faces of players and staff mid-match, and how they can vary so much depending on the situation taking place.

I have taken over 1000 photos so far this season, with a high variety in those images. It has been an interesting challenge, developing my skills with little experience, attempting to figure out what contributes to good imagery.

I am currently at the stage where I am narrowing down the images that I want to use, and then slowly taking them through the editing process, making fine changes until the image looks exactly how I want it to.

PJ Task 5 – Arthur Difford

One of the most crucial elements of photography is impacting the exposure and movement within an image using shutter speed. The following blog post explores the creative possibilities available when affecting shutter speed. Check out the photos below to see an example of the potential differences.

Caution Wet Floor

Slow Shutter Speed

The first example image demonstrates how a slow shutter speed can drastically change the look of an image. The captured photo shows a yellow caution sign not moving, but there are signs of movement from people walking behind. The crisp detail alongside the motion blur effects shows the impact of how a slower shutter speed can alter perspective.

Levitating Leo Taylor

Fast Shutter Speed

Fast shutter speeds freeze action. This image has captured Leo levitating in the air, in a split second moment. The ability to take a photo of such a brief moment means that there is potential to take images of finer details. In the world of sport, a lot of action can happen in a minimal amount of time. It is incredibly important to be able to catch these moments that only happen once.

Workshop 6 Reflection – Ben Jubb

In week 6 we focused on the specifics of post-production of imagery in photojournalism going through the two main channels of either Adobe Photoshop on our laptops or computers or alternatively using a free app called Snapseed on our mobile devices.

I did download Snapseed and have an experiment with its various functions but ultimately for the workshop task I decided to take the approach of using Adobe Photoshop because I plan on using a loaned camera for my final project instead of my mobile phone camera.

My final project will be based on planned out and still objects, not necessarily moving targets such as in a sporting game. Therefore the first image I chose was something that was similar to that of the style of photo I intend to take for my final piece.

This image had nothing to do with my final project or its theme however it was an effective image for further understanding the ins and outs of the various functions and adjustment layers that Adobe Photoshop does offer. The image (of a shoe) was taken with the flash on, and so I decided I wanted to make the image slightly darker whilst also attempting to bring out the brighter features of the shoe, essentially with the goal of highlighting the shoe and making the background less relevant. I do think it had success, comparing both the before and after versions it is clear to see that with the use of curves especially, I was able to highlight the green and orange features of the shoe whilst dimming the darker background, almost as if the ‘F-stop’ number of the camera lens was on the lower side of the scale. The camera settings were set to normal, however thanks to the manipulation of the image and editing I was able to achieve an image similar (but not exactly like) to one that was taken with a professional camera with F-stop settings, which I thought was pretty important to remember in case I don’t get a second chance with a particular shoot and it doesn’t go perfectly well.

The second image I selected was something more relevant to the course over the past couple of weeks or so, it was an image taken in the corridor just outside of the classroom of another student jumping, playing with different shutter speeds. The image had a large amount of ‘noise’ to it and various reflections of the corridor lights in different places. Whilst I wasn’t able to do much to the image to improve it, it instead served more as a reminder that some images can only have so much done to them post production, and highlighted the importance of properly setting up a shot.

Workshop Task 6 – Ben Jubb

Above is my first original image that I took and then chose to use as my ‘practice’ for editing using adobe photoshop. I decided to use this photo for two main reasons. The first being that it was taken in portrait mode and would then require editing down into landscape for online use. The second reason being that the flash was turned on so I wanted to play around with manipulating the image to make it turn out in a darker way.

The second image as shown above, has been cropped to fit an appropriate ratio, despite their being white border, and to edit this image I have used the curves adjustment layer on Adobe photoshop to reveal a darker tone to the background and focus of the image which I think highlights more detail in the shoe itself, (the writing and mesh at the front of the shoe in particular). I also played around with the ‘levels’ setting and managed to stop the base of the shoe (dark green area) from becoming too dark and then becoming irrelevant in the image.

The second image I selected was mainly because it was relevant to the course and was one I took of another student last week when learning more in depth about shutter speeds. The image itself was not a great image to edit considering the bright lights and reflection around the hallway it was taken.

The image above is the edited version. Whilst I was aware that the image didn’t have too much that could have been done to it in the first place, my focus on this image was less to ‘improve’ the image and more to experiment with the effects of different adjustment layers on photoshop. The main layer I used was the ‘curves’ setting and my aim was to attempt to cancel out each light at the top of the hallway individually, using the ‘light spikes’ in the curves setting. It had relative success.

Workshop 5 Reflection – Ben Jubb – Shutter Speed & ISO Research

This week’s task was centered around working with, what would be shutter speed on a camera, and then applying the learned knowledge in the first portion of the workshop to replicate on our mobile phone cameras. As well as this we were asked to try and apply different levels of the International Standardisation Organisation (ISO) to our work. Doing this would affect the light sensitivity of the camera, and the higher we set this the more light sensitive our camera would be.

Shutter speed, was pretty much exactly how it sounded. On a standard camera a faster shutter speed will create a shorter exposure and slower shutter speed which gives the photographer more exposure. If you are trying to take a photo to capture the specific movement in a shot, (e.g A golf ball being hit off a tee) then you would want the lowest shutter speed possible. On the contrary, if you wanted to catch a moment in an action, (e.g A raindrop falling into a larger body of water) and almost freeze frame the image, then you should use a higher shutter speed.

The concept of shutter speed was developed by William Henry Fox Talbot in the early 19th Century. In 1851 he attached a page of the London Times to a wheel that rotated in front of his camera. This resulted in a readable image exposed for about 1/2000th of a second.

As for ISO, it began with the use of film and the need to measure its sensitivity to light. The ISO system was introduced in 1974 to replace the American Standards Association (ASA) and Deutsches Institut fur Normung (DIN) and subsequently became the International Standardisation Organisation for light sensitivity in both film and digital photography.

A lower ISO number (100) should be used on a camera that has access to great lighting and is typically used outside on a sunny, bright day. This setting is designed to shoot the sharpest image possible. However on the opposite end of the spectrum, a higher ISO number (800+) should be used during shoots where lighting is sub-optimal or darker conditions, typically indoors or at night. Photos taken with this setting are thought to generate ‘noise’ due to the image being artificially brightened due to the lack of good light. Common middle ground is typically found in the range of 400-800 when taking images in a mix of bright and low light environments.

Workshop Task 5 – Ben Jubb – Shutter Speed

This first image that I took was off one of my classmates jumping in the air, and using the burst mode I was able to capture a couple of images that represented the action fairly well. The image is not perfect and still has traces of blur, however all in all I think it turned out fairly well, but if I was going to do this again I would probably take it from a bit closer up.

The second image I took was not as straight forward, after playing around with my Samsung phone camera I was pretty confident it wasn’t going to be able to replicate the live photo effect of that on an I-phone camera. So, instead I used another students phone camera and then created a long exposure effect by asking him to move his head back and forth fairly quickly, keeping the rest of his body still. The attempt had mixed results, whilst it captures the movement of the head very well, it also creates the effect further down the body which was not intended.

Workshop 4 Reflection – Ben Jubb

In week 4, after completing the extra credit task I decided to also write up a reflection on the week. Considering that most of my explaining of how I completed the task was written up on the actual task sheet, this weeks reflection will be shorter than others. This week’s workshop was focused around different F-stop numbers to use on a camera. Whilst I didn’t personally have a camera to use I managed to find a similar effect on my phone.

Initially this was actually a challenge, whilst my Samsung phone is compatible with ‘portrait mode’ it is not like a typical I-phone camera. Instead of blurring the background and focusing on the subject of an image with a low setting, it would do the opposite. Instead, this effect was achieved by using a higher setting on my phone camera, which was confusing to get to grips with initially but after some playing around I managed to figure things out.

Workshop Task 4 – Ben Jubb

Whilst this weeks workshop was intended to be used with an Iphone camera I only had access to my own phone and Samsung camera, and whilst the settings were a fair bit different to the ones being explained during the workshop, portrait mode was still available as well as different levels of strength for focus on the camera. My first image displays a classmate in full focus with all of the background of the University building in the background. The aim of the image was just to capture his full body as the main focus. I think the results came out quite well, considering his whole body is in focus and the entire background is blurry. On a professional camera this would be an example of using a low f-setting allowing for more light and creates a narrower focus or a ‘shallow’ depth of field.

The second image that I took demonstrated the use of a completely opposite f-setting, using a higher f-setting. This image, unlike the first one, attempts to capture the university in the background as well as the student in front of it. The purple Leeds Beckett flag and logo flies in the background, and the image is taken from further away to make the student less of a focus in the picture, instead making him one small piece of the image, including the other students walking by in the background. I think the image went well, however in hindsight if I was to do it again I would wait until there were no passing cars and would also try and include the Rob Burrow image in the background too.

The final image, was probably the trickiest to take. I tried to use an f-setting that was in the middle of the previous two, and perhaps it was a consequence of using a phone camera, but the image turned out very similar to the first one. Whilst the background is less blurry the focus of the image remains similar to the first picture, but just to less effect. Whilst some of the immediate background (the pavement/curb) is not as blurry I would not use this setting again.

Finally, to finish off this task I attempted to take an extra two images of 3 objects standing on a flat surface to further demonstrate the effects of different f-settings.

The first image below, attempts to show all 3 images in a sharper focus using the highest f-setting to try and capture all 3 images in a sharper focus. The image was fairly successful showing the contrast of 3 different items in a high quality focus, however the front image writing remained fairly hard to read in comparison to the image furthest away.

The second image (below) takes an image where instead only the front item is in focus using a low f-setting. Interestingly now, despite the item at the front facing the wrong way, every single word is readable unlike the first image, and now the two items further back are impossible to read. An interesting observation, that the front object is now in a much clearer focus.

Workshop 1 Reflection – Ben Jubb

My first week of photojournalism got off to an unfortunate start, after contracting norovirus over the weekend it meant I missed out in participating with the first Photojournalism lecture and subsequently the first opportunity to complete the workshop task.

Given the intensity of the last term on the course, my focus was elsewhere in the following weeks and therefore meant I was delayed in creating a story around Leeds and catching up on the missed task.

However, this delay gave me time to consider options for alternative and exciting stories, and one that seemed to have real potential presented itself.

I was able to pick a good day and considering the lighting available got a fairly good first shot of the Marks and Spencer entrance way on Briggate Street. I was then also lucky enough to be able to be present alongside taking place of some protests within the store. An employee named Amana was tasked with helping customers if they needed any assistance getting items from shelves and so I asked her for her opinion on the situation and that is how the story came to be.

Overall I am happy with how my 200 word piece ended up, despite some delays it meant that I was still able to put together something even better than if I had perhaps just done it on the day.

Workshop Task 1 – Ben Jubb

Marks & Spencer Leeds Hit Further With Closures And Protests

Following the closure of it’s store in Wellington Street in Leeds city center on the 22nd March earlier this year, M&S hasn’t exactly experienced an easy ride in the retail business in the 2025 calendar year. Claiming earlier this year that they intend to expand and focus more into it’s ‘food only’ outlets and instead move away from it’s number of full line shops.

This new approach of tackling demand has however come with it’s fair share of drawbacks including the nationwide malware attacks that have impacted it’s stores nationwide but also problems arising a bit closer to home…

Mark’s and Spencer’s huge flagship Leeds store situated on the iconic Briggate street has been hit by a series of stand off protests organized by animal rights activists groups.

Protestors can be seen sat alongside the meat aisle in M&S
Protesters can be be seen sat alongside the meat aisle in M&S Leeds Briggate Street

The protesters were seen sat specifically alongside the meat aisle in the shop for hours, refusing to co-operate with staff or security until eventually the police promptly escorted them onwards.

One employee at the store, ‘Amana’ said, “I’m not sure what they think they are achieving by doing it, customers are already frustrated enough with the way things are a the moment and having to reach over a person’s head to grab dinner doesn’t help things”